Podcasting since 2005! Listen to Latest SolderSmoke

Showing posts with label troubleshooting. Show all posts

Monday, February 5, 2024

"The Soul of a New Machine" -- Re-reading the Classic Book by Tracy Kidder

This book is especially important to the SolderSmoke community because its title has led to one of the most important concepts in our community and our lexicon:  That we put "soul" in our new machines when we build them ourselves, when we make use of parts or circuits given to us by friends, or when we make use of parts (often older parts) in new applications.  All of these things (and more) can be seen as adding "soul" to our new machines.  With this in mind I pulled my copy of Tracy Kidder's book off my shelf and gave it a second read.  Here are my notes: 

--  On reading this book a second time, I found it kind of disappointing.  This time, the protagonist Tom West does not seem like a great person nor a great leader.  He seems to sit in his office, brood a lot, and be quite rude and cold to his subordinate engineers.  Also, the book deals with a lot of the ordinary stupid minutia of organizational life: budgets, inter-office rivalry, office supplies, broken air conditioners. This all seemed interesting when I read this as a youngster.  But having had bosses like West, and having lived through the boring minutia of organizational life, on re-reading the book I didn't find it interesting or uplifting.  

-- The young engineers in the book seem to be easily manipulated by the company:  They are cajoled into "signing up" for a dubious project, and to work long (unpaid) hours on a project that the company could cancel at any moment. They weren't promised stock options or raises;  they were told that their reward might be the opportunity to do it all again. Oh joy.   This may explain why West and Data General decided to hire new engineers straight our of college: only inexperienced youngsters would be foolish enough to do this. At one point someone finds the pay stub of a technician.  The techs got paid overtime (the engineers did not), so the techs were making more money than the engineers (the company hid this fact from the engineers). The young engineer who quit probably made the right move. 

-- The engineers use the word "kludge" a lot.  Kidder picks up this term.  (I'm guessing with the computer-land pronunciation that sounds like stooge.)  They didn't want to build a kludge.  There is one quote from West's office wall that I agree with:  "Not everything worth doing is worth doing well." In other words, don't let the perfect be the enemy of the good.  Sometimes a kludge will do. 

-- Ham radio is mentioned.   One of Wests lead subordinates was a ham as a kid.  Kidder correctly connects this to the man having had a lonely childhood. Heathkit is also mentioned once, sarcastically.  

-- The goal itself seems to be unworthy of all the effort:  They are striving to build a 32 bit computer.  But 32 bit machines were already on the market.  The "New Machine" wasn't really new.  

-- Kidder does an admirable job in describing the innards of the computer, but even as early as the 1978 models,  I see these machines as being beyond human understanding.  The book notes that there is only one engineer on the hardware team who has a grasp of all of the hardware.  The software was probably even more inscrutable. 

-- I found one thing that seemed to be a foreshadowing of the uBITX.  The micro code team on this project maintained a log book of their instructions. They called it the UINSTR.  The Micro Instruction Set.  Kidder or the Microkids should have used a lower-case u.     

-- The troubleshooting stories are interesting.  But imagine the difficulties of putting the de-bugging effort in the hands of new college graduates with very little experience.  I guess you can learn logic design in school, but troubleshooting and de-bugging seem to require real-world experience.  We see this when they find a bug that turns out to be the result of a loose extender card -- a visiting VP jiggled the extender and the bug disappeared.  

-- Kidder provides some insightful comments about engineers. For example: "Engineering is not necessarily a drab, drab world, but you do often sense that engineering teams aspire to a drab uniformity."  I think we often see this in technical writing.  Kidder also talks about the engineer's view of the world:  He sees it as being very "binary," with only right or wrong answers to any technical question.  He says that engineers seem to believe that any disagreement on technical issues can be resolved by simply finding the correct answer.  Once that is found, the previously disagreeing engineers seem to think they should be able to proceed "with no enmity."  Of course, in the real world things are not quite so binary. 

-- This book won the Pulitzer prize, and there is no doubt about Kidder being a truly great writer, but in retrospect I don't think this is his best book.  This may be due to weaknesses and shortcomings of the protagonist. I think that affects the whole book.  In later books Kidder's protagonists are much better people, and the books are much better as a result: for example, Dr. Paul Farmer in Kidder's book  Mountains Beyond Mountains. 

-- Most of us read this book when we were younger.  It is worth looking at again, just to see how much your attitudes change with time. It is important to remember that Tracy Kidder wrote this book when he was young -- I wonder how he would see the Data General project now. 

-----------------------

Here is a book review from the New York Times in 1981: 

https://archive.nytimes.com/www.nytimes.com/books/99/01/03/specials/kidder-soul.html?CachedAug

Here's one about a fellow who also re-read the book and who provides a lot of good links: 

https://auxiliarymemory.com/2017/01/06/rereading-the-soul-of-a-new-machine-by-tracy-kidder/
Thursday, January 25, 2024

RIP Arno Penzias -- Co-discoverer of the Big Bang Cosmic Background Radiaton


Penzias on the right

Here it the Penzias Obituary:

I think this is one of the best troubleshooting events in radio history:  they thought at one point that what they were hearing was the result of pigeon poop in the antenna.  Turns out they were hearing radiation from the birth of the universe. 

And here is a wonderful 2014 6 minute podcast with Penzias and his co-discoverer Robert Wilson:
 

Monday, October 23, 2023

Bringing a Faulty Herring Aid 5 Receiver Into the Light -- Fixing the AF Amp Schematic Error (video)


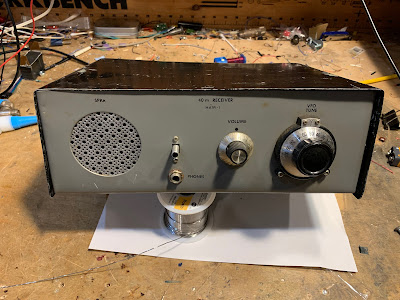
I picked up this old homebrew receiver in March 2023 at the Vienna Wireless Society's Winterfest Hamfest.  It is a Herring Aid 5.   I was surprised to see that the builder (who was he?) got the windings on the VFO transformer right.  Later, I learned that he had also substituted MPF-102s for the original Radio Shack FETs called for in the QST article. This allowed him to overcome the PC board layout problem at Q5 (VFO).  With an MPF-102, he was able to get Q1 working by kind of shoe-horning the leads into the proper holes.  FB OM.  Whoever he was, he seemed like a really competent builder.

The Hamfest Herring Aid 5

But then I started wondering:  Did he also overcome the big problem in the audio amplifier?  You see, there is an egregious error in the QST schematic.  Between the collector of Q3 and the base of Q4 (the two AF amplifiers) they have a 10uF capacitor to ground.  That would send most of the audio to ground. This is clearly a mistake.  Not only does it not make any sense, but this cap to ground does not appear in the PC board drawing, nor in the photograph that went with the QST article.  I included this cap in my 2014 built of the Herring Aid 5, but with it, I found the receiver to be exceedingly deaf.  When I clipped that capacitor out of the circuit, my 2014 Herring Aid 5 sprang to life.  Did this hamfest Herring Aid 5 have the error capacitor?  Would it too be brought into the light by clipping one lead?  

Sadly, the erroneous third capacitor was there, and it was wired into the circuit.  The receiver worked,  but just barely.  It was very deaf.  You could not hear 40 meter band noise, and you could barely hear strong CW signals.  Builders may have thought that this was normal with such a simple receiver. 

3 10uF caps. The center one is an error.  I have clipped it out

In the video above you can see what happens when I cut the lead to the mistake capacitor.  Suddenly, you can hear band noise, and CW signals.  The receiver comes to life -- for the very first time!  

This was an error that echoed through the decades.  As far as I know there was never a published errata.  The erroneous capacitor is there in the 1977 ARRL book entitled Understanding Amateur Radio.  In 1998,  NORCAL QRP redid the Herring Aid 5.  Incredibly, THEY INCLUDED THE OFFENDING CAPACITOR in their new and improved schematic.  

NORCAL's 1998 Schematic included C14

I'm fixing up this old receiver a bit.  It was nice to have it playing 40 meter CW yesterday.  Better late than never.  

This morning I was feeling kind of guilty about paying so much attention to a receiver from 1976.  But then I opened the paper and read about the recent find of a DeLorean car.  Heck if a DeLorean from the early 80's is worthy of attention, so is a homebrew receiver from the late 1970s. 

Wednesday, October 18, 2023

A Big Error Discovered in the 1976 QST "Herring Aid 5" Article (After 47 Years)

Click on image for a better view.  See arrows for Q1, Q5 and the parts list.

I tried as a teenager to build the Herring Aid 5 direct conversion receiver from the July 1976 issue of QST.  I could not get it to work. Important points: 1) I was attracted to the fact that this receiver used only parts available from local Radio Shack stores (I bought them) and 2) The article provided a PC board pattern (I also bought ferric chloride and etched a board). 

Looking back, I concluded that I had failed to get the VFO to oscillate.  I remember hearing signals when I tuned my HT-37 transmitter (on Cal, on 40) near the receiver.  I was very close, but I never got that Herring Aid 5 VFO to oscillate.

Thirty-eight years later I tried again to build the receiver.  Important points:  This time I used mostly junk box parts and Manhattan-style construction (no etching).  Still I could not get the VFO to work.  ZL2DEX spotted a problem -- I had wound the L6 and L7 coils with the wrong "winding sense."  I corrected this, and BOOM! the VFO sprang to life.  I assumed that I had made a similar "winding sense error" way back in 1976.  This, I thought, explained my failure to get the receiver working.  The QST article had warned that proper phasing of L6 and L7 was necessary.  I figured that I just hadn't fully understood what "proper phasing" meant.  So it was, I thought, all my fault.    

 
Here is the PC board pattern from QST.  Arrows show Q1 (DGS) and Q5 (DSG).  
But it is the same kind of FET!  Click on the image for a better view.

But then on October 17, 2023 a comment appeared on the SolderSmoke YouTube channel.  Rick WD5L had also -- back in the late 70's -- tried to build this receiver.  He recently looked closely at the recommended parts list (that we used!) and at the QST PC board pattern (that we also used). AND HE SPOTTED AN IMPORTANT ERROR IN THE QST PC BOARD PATTERN.   

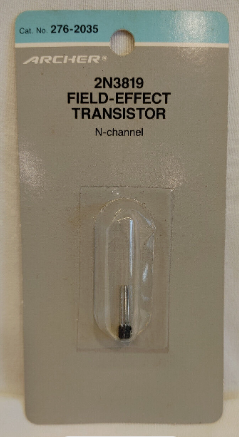
Take a look at the pattern for Q5 above (see arrow).  That is the VFO FET.  A Radio Shack 2035 FET has a DGS pinout (see below).   The Gate is the center pin.  If you put this transistor into the PC board pattern above you would definitely be grounding the Gate.  There is no way the VFO would work under these circumstances.  Note too that the only other RS 2035 FET in the receiver is Q1 (the RF amplifier).  In the PC board pattern above Q1 is marked correctly as DGS.  This confirms the error in the Q5 PC board pattern.  There is no way an RS 2035 transistor can simultaneously have two different pinouts! 

Wow.  So this failure to get the VFO working may not have been my fault after all.  I may have actually gotten the transformer winding correct, but even if I did, there is no way this VFO would have worked using the part called for by QST and the PC board pattern shown above.  As a teenager I just did not know enough to spot the error or the inconsistency.  I kind put blind trust in QST.  I just couldn't get the thing to work.  

Rick searched the QST archives to see if they ever put out an errata on this.  So far, nothing. Worse yet, the scan of the PC board pattern on the QST site is very unclear and may have the pin designations on Q5 scratched out. This would make it more difficult to spot the problem.  (The image above is not from ARRL.  It is from a high quality scan of the original QST article done this week by a fellow Vienna Wireless Society member.)  Please let us know if you find any kind of errata or any acknowledgment of error.  

This is really pretty bad.  This was a project aimed at novices.  Far from encouraging homebrewing, this type of mistake is the kind of thing that would push people away from the soldering iron.  

Ironically, I may have been doomed by opting to use the QST PC board.  If I had used Manhattan-style construction (as I did in my more recent build) I would not have fallen victim to this PC board pattern error.  Also, if I had built this thing stage-by-stage (as we always now recommend) I would have more clearly realized (back in 1976) that the problem was in the VFO stage.  But I was 17 and didn't know.  I put blind faith in the QST article.  It never occurred to me that something in print could be wrong.  This realization came much later. 


There is more to talk about on this ill-fated project. In future posts I will discuss another error, this one in the AF amplifier.  And possible additional errors...  And I'll write about the 1998 resurrection of this project by NORCAL QRP and the New Jersey QRP clubs.  

Thanks to Rick WD5L for spotting the PC board error. 

Friday, October 6, 2023

A Pretty Good Troubleshoot -- Fixing the Transmitter in my 75/20 meter Mythbuster Transceiver -- Mind the Gap!

Bidirectional Termination Insensitive Amplifier by W7ZOI and K3NHI

All of a sudden the transmitter in my 75 & 20 meter dual band homebrew Mythbuster transceiver stopped working -- there was no output at all.  I went into troubleshooting mode.

The first clue was that the receiver was working fine. This meant that many stages of the rig were taken out of suspicion:  It probably wasn't the VFO, the first mixer, the BFO/Carrier Oscillator,  the second mixer, or the bandpass filters. Nor was it any of the receive sections in the bidirectional amplifiers I was using.  

Suspicion fell on the power amplifiers and on the transmit sections of the bilateral amplifiers.  

With the output going to a dummy load,  I put the rig into transmit mode and put a bit of audio into the mic jack.  Then with the 'scope I started to work my way back from the antenna jack.  I wasn't seeing anything.  Then I got back to the transmit side of the TIA amplifier between the crystal filter and the mixer.   There was a strong signal at the input, but nothing at the output.  Bingo!  I had found the faulty stage.  But where, exactly, had this stage gone wrong? 

There are three transistors on each side of a TIA amp (see schematic above) -- I just started from the input of the first one with my scope probe and moved through the circuit.  Finally, at the output of the last of the three amplifiers, the signal stopped.  I knew I was very close to the problem.  

Looking at the components, suddenly I could see the problem:  At the output there is a 47 ohm resistor (R2 in the circuit diagram above) and a .1uF cap in series.  The cap went to a Manhattan pad.  But when I looked at it closely, the lead was kind of floating above the pad.  See it? 

Mind the Gap 

And when I moved it, the connection between the 47 ohm resistor and its pad seemed quite flimsy. 

I quickly replaced both components and was back on the air. 

I don't really know how or why the lead to that capacitor broke.  Maybe I had bent it repeatedly, to the point of weakness, and, over time, it just let go.   

Whatever the cause,  I found this to be a satisfying troubleshoot and repair.  It required me to think a bit about what could be wrong, and to use some test gear to zero on on the faulty component.  

Out with the old...

Saturday, September 23, 2023

Sunburst and Luminary -- An Apollo Memoir by Don Eyles (video)


Buy the book from the Amazon link on the right side of the page >>>>>>>>>>>>>>>>>>>>>>>

There is so much great stuff in this 2018 video.  I am definitely going to buy the book.  This is another of those things that reminds me (a hardware guy) of the importance of software (Sunburst and Luimary were the names of two programs that Eyles wrote to enable the LEM to land on the moon).  

-- Asked about one of the biggest ancillary contributions of the Apollo program,  Eyles immediately says, "integrated circuits."   They used three terminal NOR gates.  Lots of them. 

-- They never had a hardware failure in the Apollo computers.  Demonstrating a classic troubleshooting technique, when they discovered what they thought was a hardware failure, they ran the program on another computer.  The problem was also there, so they knew there had been no failure on the first machine. 

-- The LEM simulator was very cool. 

-- Eyles' ability -- in two hours -- to write the code for the automatic landing program that Astronaut John Young was asking for, then have it flown on an Apollo mission to the moon was very impressive. 

Thanks to the MIT Museum for posting Don's talk.  And thanks to HackADay for alerting us to it.

Also, take a look at this one: https://www.youtube.com/watch?v=oi4h04ZgQsQ

Tuesday, June 20, 2023

Part 2: CuriousMarc Fixes an All-Discrete Counter -- "Like an IC, but in discrete form."

Marc nicely sums up this project with this line:  "It's an IC but in discrete form!"  On the same theme, he later says, "Who needs a logic analyzer when you can do a visual debug with neon bulbs?" 

Very cool.  Lots of troubleshooting and repair lessons in this video: 

-- Again we see the benefits of paper manuals.  (Todd K7TFC commented astutely on this under yesterday's post.)

-- 2N2222s to the rescue.  

-- A surprisingly large number of bad transistors (6?) found.  Why did they go bad? 

-- Marc repeatedly says, "Let me poke around."  Poking around is often important.  Mark fixes the reset line after poking around.  He is not sure HOW he has fixed it, but he has... by poking around.  Sometimes this happens.  Thank God for small favors. 

-- Marc has some fancy HP board extenders.  I am jealous.  

-- He also has a cool de-soldering tool.  More jealousy.  Want one. 

-- Marc's understanding of how the HP engineers had to put one of the flip-flops "on the edge of stability," and how his 'scope probe was capable of disturbing this stability. 

-- Remember that those Nixies are TUBES with enough voltage on them to really zap you.  So be careful in there.  This is an especially dangerous mix of transistor tech and tube tech.  With transistors you can work on them with the rig fired up.  With tubes, well, you have to be careful.

Part III tomorrow. 


Monday, June 19, 2023

CuriousMarc Repairs an old DISCRETE COMPONENT HP Frequency Counter


I really liked this repair video from CuriousMarc (aka AJ6JV).  This counter pre-dates the use of integrated circuits -- it is all discrete transistors.  Near the end, Marc mentions how this made this repair "like debugging a big integrated circuit, but with access to each transistor -- this made it quite satisfying."  I hear ya Marc -- with big ICs maybe all you would get to do would be to swap out a single IC.  There would not be much of a challenge there.  

With the older, discrete circuitry you get a good view of how Marc troubleshoots -- how he finds the precise points where the device is failing.  Note his use of the old HP paper manuals. I know this is an old guy thing, but I think the paper manuals (as opposed to the online versions)  just make the process easier.  Note too that Marc at one point had to go back to microfiche. 

The transistor tester Mark used was very cool. 

The whole physical structure of the HP device is very similar to my NYC HP8640B.  Thanks again Steve Silverman and Dave Bamford. 

I will look at Parts II and III of this series soon.  

Friday, April 28, 2023

High-School Students Successfully Avoid THE SHELF OF SHAME -- Update on the Direct Conversion Receiver Project

One of the first finished receivers

Dean KK4DAS, Mike KD4MM, and I had a good day at the local high school yesterday, even after a month of spring break and other absences.  We thought this might have been our last session at the school this year, so we strongly encouraged the students to GET THE RECEIVERS DONE.  We told them about the Shelf of Shame, and warned them not to half-way finish something that would gather dust at the bottom their parents' closet.  They were close to success!  It was time to finish the project. 


We warned them not to be perturbed if the receiver doesn't work the first time they power it up.  This is not "plug and play."  The receiver would likely need some trouble shooting, or at least some peaking and tweaking.  We noted that we often have to sort of coax a signal out of a newly built receiver. 

We soon had the students come forward with two projects that were ready for final testing.  Sure enough we found problems with both.  The solutions provided a lot of educational fun. 

The first group had not yet built the diplexer -- we advised them to skip over the diplexer for the moment -- just connect the output of the mixer to the input of the AF amplifier.  We can't let the perfect be the enemy of the good!  Build the diplexer later, but for now, get the receiver going.  They did, and a few minutes later they were receiving signals from Mike KD4MM's transmitter (on the other side of the lab). 

Then a second group came forward.  We put a San Jian frequency counter on the PTO output.  Uh oh.  Trouble.  Gibberish!  A wonderful troubleshooting session ensued.  With the student, we found that the signal was good at the output of the oscillator transistor, but NOT at the output of the buffer.  At first we suspected that the buffer was bad, but it was not.  Then we lifted the connection to the mixer and suddenly the buffer output was good.  So the problem was in the mixer!  When we disconnected the input transformer of the mixer from the diode ring, THE PROBLEM WAS STILL THERE.  So the problem was clearly in the input transformer.  Dean gave us a replacement transformer.  Soon all was right with the rig, and this group joined the ranks of the successfully completed receivers.   

I think that seeing that two groups had finished helped motivate the others.  Our announcement that successful completion would lead to a "Certificate of Completion" also helped.  But most of all, I think the natural desire to finish the job and avoid the "Shelf of Shame"  was pushing the students forward. 

Other news: 

-- Our stage-by-stage award program continued.  Last time we awarded "The Torry"  for the first successful bandpass filter;  this time we awarded "The Audy" for the first successful audio transformers. 

The Audies

-- We told the students that their work has been entered in a Hack-A-Day contest.  Most of the info and files on the project can be found on the Hack-A-Day site.  Check it out:  

https://hackaday.io/project/190327-high-schoolers-build-a-radio-receiver

-- We also told the students about Walter KA4KXX's very generous offer of a reward for the first students to check into the Florida Sunrise net.  (We had to make it clear that this offer is completely extracurricular and unconnected in any way from the school .)  The students were clearly intrigued.  Sunrise Net may get some new check-ins! 

-- We provided instructions on how to build a simple 1/4 wave reception antenna.  We also did a video.  


We had thought that this would be our last session at the school,  but at the students' request we will be back with them next week for another session.  We think there are at least five more receivers approaching the finish line. 

Friday, March 10, 2023

Troubleshooting an Intermittent with Mr. Carlson. And Troublesome Tube Re-Branding.


This is a really great video on how Mr. Carlson (VE7ZWZ) did troubleshooting on a tube-type receiver. The problem was an intermittent.  They can drive you nuts, but Mr. Carlson show us how to stay sane. 

-- His use of ordinary observation at the start of the process is very important.  He notices a flickering glow in the voltage regulator tube.  The flickering coincides with the intermittent noise that he is trying to fix.  That is an important clue. 

-- He also can see that the grid of one of the AF amplifier tubes is getting way too hot: grid emission.  That is another important clue.  

-- He checks the grid voltage on the AF amplifier and finds that it is way too low.  It is fine on the other side of the resistor that carries the voltage to the tube.  But it is close to zero at the grid.   This means that the mica capacitors on the grid are suspect. 

-- He uses some fairly esoteric test gear -- a homemade device and an an old Heathkit signal tester -- to check his diagnosis.  They confirm that the mica caps are the problem.  He replaces the caps and the problem is gone.  A very satisfying troubleshoot. 

Mr. Carlson presents us with a lot of good info: 

-- 6K6 tubes were often in fact 6V6 tubes.  And 12AX7s were often 6VJ8s!  Manufacturers were deliberately re-branding tubes. So we shouldn't be surprised if some of our solid state devices turn out to be a bit different from what was promised.  This practice goes way back. 

-- I liked Mr. Carlson's final sensitivity test on the receiver -- he just waved his hand near the antenna connection and we could hear the receiver respond.  Excellent. 

-- Mr. Carlson is very negative about the use of polystyrene caps in oscillator circuits.  But we these simple and cheap caps being used to good effect in oscillators in India.  

-- The leaky and bad micas were a bit surprising.  Carlson speculates that their proximity to heat-producing resistors might have caused the trouble. 

Finally, it is interesting to hear the Canadian pronunciation of radio words:  Solder with the L pronounced (as in the UK).  Farad with the second A long and the final D emphasized (I say it just as the first two syllables of Michael Faraday's last name). 

Thanks Mr. Carlson. 

Friday, March 3, 2023

My HP8640B Signal Generator Lives Again

I'd really come to like this old signal generator.  The construction is superb.  It was built to be repaired.  As you open it up you find all kinds of useful diagrams and pointers.  It is very solidly built - it looks like something that was built for the Apollo program.  And it was given to me by a friend:  Steve Silverman KB3SII gave it to me in 2017 -- he had it in his New York City shack.  Dave Bamford W2DAB picked it up for me just before Steve moved out of the city.  

I've already done one complex  repair on it -- one of the tines on one of the selection switches fell of and I had to replace the tine.  That was difficult, but it was a very satisfying repair.  

But lately, the HP8640B started acting up again.  It developed an intermittent problem that caused both the signal generator and the frequency counter to just shut down.  

I was thinking that this might be the end of the road for the HP8640B.  I even started looking for alternatives.  But they were all very unappealing.  They come in plastic boxes with names like Feeltech and Kooletron.  The boxes are filled with flaky wiring and boards hot glued to the plastic.  Yuck.  The contrast with the HP8640B could not be stronger.  

So I started to think about the problem.  This was the first part of the troubleshooting process.  I asked myself:  What would cause several different systems (counter, frequency generator, and display) to all shut down?   The power supply was a leading candidate.  

I started reading the power supply section of the HP8640B manual.  There was a line in there that caught my eye:  The power supply boards had on them LEDs that glowed if the board was functioning.  Thank you Hewlett Packard!  I opened the top of the signal generator and found the power supply boards. Sure enough, there were the LEDs.  I turned the generator on, and found that one of the lights was out. Bingo. (Trevor takes a look at the power supply boards in the video above.  I have it cued up to the 12:57 point at which he talks about and shows these boards.) 

Here was the other clue:  The problem was intermittent.  It kind of seemed like a loose connection.  So I just unseated the board and took it out.  I put some De-Oxit on the connector and popped it back in.  Boom:  The LED came on and the HP8640B came pack to life. 

There is a whole bunch of great info and videos on the HP8640B on the internet.  It is almost as if a cult has developed.  This signal generator is worthy of a cult following.  Count me in.  

I especially liked the video below.  Kevin really captures the admiration that many of us feel toward the way this piece of gear was built.  He also kind of hints at the way this sig gen could become a pirate transmitter on the FM broadcast band (at 8:44):  

I know that eventually the problematic plastic gears in this device might fall apart.  I am prepared for this:  I already have the metal replacement gears from India.   

Thanks again to Steve Silverman KB3SII and Dave Bamford W2DAB for bringing me into the HP8640B cult. 


Saturday, February 18, 2023

Progress Report: High-School Students Melt Solder and Successfully Build Oscillators

Dean KK4DAS and I were at the high school on Thursday and Friday of this week for the construction (by the students) of the variable frequency oscillator stage of their analog, discrete, direct-conversion receivers for 40 meters.  Most of the students have already obtained their Technician Class licenses, so they are already radio amateurs.  Both the licensing classes and the receiver build are being done with the assistance of the Vienna Wireless Society. 

A week earlier Dean and I had demonstrated how to build the oscillator stage using the Manhattan technique (isolation pads super-glued to copper clad boards), but this week was the first time these students were actually building anything like this themselves. 


We deliberately did not "spoon feed" the students.  We told them that while we would be on-hand to help, THEY would have to do the building.  They would have to layout the pads on the PC board, select the parts (from a table set up by Dean), and do the gluing and soldering.  We did not hand the students bags of parts, or prepared PC boards.   This was not going to be a kit building session.  We wanted this to be real homebrewing. 

We had parts for 15 receivers.   But on the first day there were more than 60 students.  So four students per project.   On the first day we actually ran out of soldering stations.  

We cautioned the students against dawdling.  We told them to get on with it, and to "make haste slowly." We also injected an element of competition into the build by announcing that the first team to achieve oscillation would win.  (Prize still TBD).   

By the end of the Thursday session, many boards had been built but there were not yet any oscillations. We reconvened on Friday afternoon -- Dean and I set up support/troubleshooting stations. 

Right off the bat, one of the students came up with a board that he wanted to test.  After one quick correction (enamel still on the oscillator coil leads), my frequency counter showed that it was oscillating.  I fired up my DX-390 receiver and we heard the loud tone.   We had a winner! 

In the following hour or so, Dean and I did troubleshooting on about 10 more boards.   We found some of the problems that we would all expect (because we have all made these mistakes ourselves!): 

-- There were cold soldering joints.  We showed the students how to properly solder -- usually they just had to re-heat some cold-looking connections. 

-- A few of the Zener diodes and transistors were wired in backwards (been there, done that).  

-- A few of the feedback capacitors were of the wrong values.  Dean and I had brought some good caps, so the students were able to quickly swap out the parts.  This was another good lesson. 

-- There were a few wiring errors -- these were quickly corrected. 

It was exciting.  One-by-one we would hear the whoop-whoop as the DX-390 confirmed that another oscillator was OSCILLATING!  The students really liked to HEAR the oscillations that they had created.  We reminded them at the beginning that they would be taking DC from a little square 9 volt battery and turning it into RF that could (if connected to an antenna) be heard around the world, or in our case be used to receive signals from around the world.  

We got eight of the oscillators going.  We think the students will be able -- without much help from us -- to get the remaining seven oscillators going.  

They learned a lot.  They learned about the ease, flexibility, and usefulness of the Manhattan technique, and we think they could see how this represents a basic kind of PC board design.  Their soldering skills improved a lot. And they learned how to troubleshoot:  Is the layout correct?  Are any parts wired in backwards.  Is the soldering OK?   Are any of the parts bad (or of incorrect values)?  Most importantly, they learned that they CAN build circuits themselves, and actually get them working. 

The real payoff came each time oscillation was achieved. The students were really amazed and pleased.  I could tell that some of them weren't really sure their little device was actually creating the signal they were hearing.  So while we listened to the DX-390, I asked them to disconnect and reconnect the battery.  Confirmed.  Oscillation!  Smiles.   It was really great.  

Soon, after finishing up some PTO odds and ends,  we will move on to the other stages.  We'll probably do the bandpass filter or the mixer next.   Then the AF amp.  Then put it all together into a full receiver.  We think each stage will get easier and easier to build as the students learn and improve their homebrewing skills and their self-confidence. 

We've often reminded the students that what they are doing is NOT easy.  This is hard.  As new radio amateurs, they are taking on a project that most older hams never dare to take on.  They like the challenge.  They are homebrewing a real receiver. 

Sunday, February 12, 2023

Mr. Carlson Replaces Old Capacitors -- Bathtub Capacitors


I recently posted a video from CuriousMarc about whether or not to replace electrolytic capacitors in old pieces of gear.  This is a hot topic in restoration circles. 

This week Mr. Carlson put out a video (above) in which he got rid of a bunch of "bathtub" capacitors in an old receiver. 

One of the many interesting things in Mr. Carlson's video was how his test gear initially showed the old capacitors to be good, but on further examination with better test gear he found them to be BAD! 

Out with old, in with the new!  

Friday, February 3, 2023

CuriousMarc (AJ6JV) Goes to a Hamfest


Jean Shepherd once said that all of us at one point come to a cross-roads in our lives -- one road leads to success, the other to ham radio flea markets.  

As I watched this, I realized that CuriousMarc sounds like a ham.   Sure enough, some Googling revealed that his real name is Jean-Marc Verdiell and his ham radio callsign is AJ6JV. 

I knew Marc was one of us when, in the video, he opens up the teletype.  He says that the seller claimed that it still worked.  But Marc comments that he hopes that this is not true, so that they will be able to troubleshoot and fix the device.  FB.  That's the spirit.  

We are really lucky to have someone as successful and creative as Marc in the ranks of ham radio operators.  

Be careful with the high voltage Marc!  

Tuesday, December 13, 2022

Save the Antenna!


SolderSmoke fans have an interest in saving this antenna because it is the site of one of the most amazing RF troubleshooting stories of all time:  Wilson and Penzias were trying to track down some noise.  At one point they thought it might be the result of bird droppings.  Uh, no, it was really the result of the Big Bang!  Please sign the petition: 


Wednesday, August 3, 2022

Can a Biologist Fix a Radio?


Andreas DL1AJG (who in real life is a professional biologist) sends us this excellent article about how biologists approach problems in living cells as opposed to how engineers or technicians approach problems in broken radios. 

This excerpt from the 2002 article gives you an idea of the tone and content of the article: 

"... I started to contemplate how biologists would determine why my radio does not work and how they would attempt to repair it. Because a majority of biologists pay little attention to physics, I had to assume that all we would know about the radio is that it is a box that is supposed to play music. How would we begin? First, we would secure funds to obtain a large supply of identical functioning radios in order to dissect and compare them to the one that is broken. We would eventually find how to open the radios and will find objects of various shape, color, and size (Figure 2). We would describe and classify them into families according to their appearance. We would describe a family of square metal objects, a family of round brightly colored objects with two legs, round-shaped objects with three legs and so on. Because the objects would vary in color, we would investigate whether changing the colors affects the radio's performance. Although changing the colors would have only attenuating effects (the music is still playing but a trained ear of some can discern some distortion) this approach will produce many publications and result in a lively debate..."

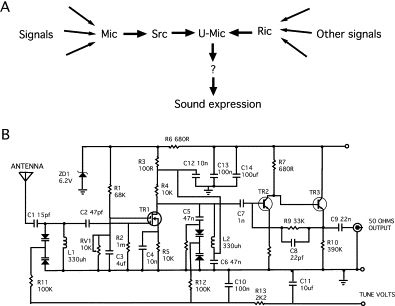
Andreas points to diagrams in the article (see below).  The first (A) shows how the biologist might view the radio.  The schematic (B) shows how engineers or technicians view it: 


As I read the article, I was reminded of the wise advice frequently dispensed through the SolderSmoke podcast:  Do not look at a schematic as one single circuit.  Instead try to see it as a number of subcircuits.  Build and test these subcircuits separately.  Join them together only after each subcircuit is found to be working. 

Here is the link to the 2002 article in Cell by Yuri Lazebnik:  https://www.cell.com/fulltext/S1535-6108(02)00133-2

This is all really interesting.  I will share this with my son who is involved now in biological research. 

In addition to his day job as a biologist, Andreas is a homebrewer of radios. Here is a pictures he sent to us back in 2019 of a regen receiver that he built: 


Andreas asks if he might need an old Boatanchor radio to work on to improve his electronics/physics skills.   I'd suggest staying away from the older tube stuff.   Stick with the BITXs -- homebrew one, stage by stage.  And indeed,  use the engineering approach to the electronics!  

Saturday, May 21, 2022

Repairing the Sony ICF SW1 Receiver -- Used for Numbers Station Reception? Why no replacement for C-625?


Ten years ago, my friend John gave me this tiny Sony receiver.  It wasn't working.   I tried to fix it but quickly discovered that the tiny size of the device made repair difficult.  All you needed to do was to swap out some leaking electrolytics, but they are surface mount electrolytics -- replacing them is not for the faint of heart.  Kits are available, but again, this is not easy. 

In 2020 I got one of the kits, but didn't try to use it until yesterday.   It only supplied six of the electrolytics.  In the video above, they discuss replacing seven electrolytics, including the one that seems to be placed in the round black holder. C-625.  Why didn't my kit include a replacement for that one?  Could it be that this capacitor was not one of the leaky SMD caps?  

Replacing these caps really wasn't easy. At one point I inadvertently removed not just the bad cap, but also a nearby surface mount resistor.  Luckily the schematic showed it to be 0 ohms.  That was easily replaced.  I lifted one of the pads on one of the other caps -- I just slid it back into place and hoped for the best. 

BTW, I just today discovered that this little receiver may have been used late in the Cold War by those who needed to receive messages from the infamous Numbers Stations: 

 https://www.cryptomuseum.com/spy/sony/icfsw1/index.htm

Tuesday, May 17, 2022

Troubleshooting and Fixing Old Faults in my Long-Suffering Hammarlund HQ-100 (Part 2) (video)


Work continues on my old Hammarlund HQ-100. I give background on the rig and explain the electrical trauma it likely suffered. Following Dave K8WPE's dictum that we can still learn a lot from old receivers, I dug into this one. I wanted to fix a long-standing S-Meter/AVC problem. This led me to an interesting troubleshoot, with at least one "waste of time" detour. Eventually I found the fault in one of the coils in the grid circuit of the RF amplifier. The coils had been smoked years ago, perhaps by a lightning strike. I came perilously close to permanently losing 10-30 MHz. But I figured out how to fix the smoked coil. So my S-Meter/AVC problem was fixed. I really like listening to this thing. There is still a lot of nice material on the SW bands. There are some very nice broadcasts in Spanish. Please subscribe to my YouTube channel.

You can see where the coil burned. Wire remained intact, but the insulation burned creating a Primary to Secondary connection.

I just very carefully lifted one of the coils way from the other, eliminating the unwanted connection.

Here's my homebrew "RC Printed Network" Z2 module. This was unnecessary -- the original was good. I put the original back in.


Electric Radio magazine recently ran a two part series on the HQ-100. I have ordered these issues of the magazine.

Saturday, April 9, 2022

WD-40, a Hard Drive, a Coat-Hanger Antenna, Dumpster Diving, and Amateur Radio Satellites from the Azores


Last month I was talking to Ira VP2EIH on my new 1712 SSB rig.  Ira is interested in satellites.  Talking to him caused me to dig up some old material about satellite operations.   Here is a 2003 QST article about working the satellites from the Azores: 


Regarding the usefulness of WD-40, during my time in the Azores John EI7BA once told me that WD-40 is, "the Pope's pee!"  Apparently that is high praise in Ireland.  It is indeed good stuff. 

Messias CU2BJ is a Silent Key.  I hope Ray CU3GC, WL7CDK is doing well.  

Thursday, March 17, 2022

Colin M1BUU's Homebrew Manhattan SST


Wow, especially on St. Patrick's day I think it is appropriate to say " 'tis a thing of beauty. "

Colin did a great job on his homebrew version of the SST transceiver. It looks like his is on 30 meters.   I especially liked his description of the troubleshooting that followed the construction.  the assist provided by AA7EE's blog was especially cool, and demonstrates the long-lasting power of internet-shared tribal knowledge. 

Colin wrote (on Facebook):  

I was inspired by Bill and his adventure with the SST-20, so I started gathering a few parts last year to build a Manhattan SST. I did a joint SOTA activation with a fellow homebrewer ham at the end of January and we started talking about classic portable CW rigs, it turned out that we both had an SST build on our 'list'. I was challenged to build the SST for the next joint SOTA activation!
It took a lot of effort and a few late nights but I did manage to produce a rig capable of making QSOs for a joint SOTA activation of Fair Snape Fell, G/SP-007. I'd done a solo activation of Pendle Hill G/SP-005 a few days before with the rig for a trial run and I discovered that the AF was very low. After some troubleshooting I noticed that I'd soldered the LM386 gain set capacitor to an incorrect pad. Doh! I fixed my error and the rig had much more gain.
I found that with the improved AF gain, the rig would squeal if the gain was turned up. I was ready to give up really, but after a cool off period, I began researching the issue and it turns out that it's very common and indeed I found posts from 1997 about it! It seems as though my recreation was so faithful to the original, I'd included the original flaws too! I added in a 0.1uF cap and resistor connected to pin 5 of the AF amp chip as per the suggestion on Dave AA7EE's blog and now the squealing has stopped.
I'd made 14 QSOs during the joint SOTA activation, so I considered my challenge to have been met! It's been a bit of an epic build!
73, Colin, M1BUU


Designer: Douglas Bowman | Dimodifikasi oleh Abdul Munir Original Posting Rounders 3 Column