Podcasting since 2005! Listen to Latest SolderSmoke

Showing posts with label Kits. Show all posts

Monday, March 11, 2024

Radio Items Picked-up at VWS Winterfest 2024 Hamfest

As always, click on image for a better view

Above you can see what I picked up at the Vienna Wireless Society's 2024 Winterfest Hamfest. 

-- On the left in the blue box is an MXM Industries SuperRX/TX 40 transceiver. It is a kit from a Texas company.   Superhet receiver with IF at 455 kHz.  Crystal controlled CW transmitter on 7040 kHz.  The oscillator works, but so far no receive signals.  I will have to troubleshoot.  Does anyone have a schematic? 

-- Behind the MXM there is a nice box marked "Diode Detector" I opened it up and there is just a solid state diode and a 50 ohm resistor to ground.   Box may be useful. 

-- I got a couple of books: "Weekend Projects" 1979 from ARRL, and "A History of QST -- Volume 1 Amateur Radio Technology 1915 - 2013" 2013 from ARRL. 

-- On top of the Weekend Projects book you see a "Crystal Holder" from Gross Radio of New York City.  W1UJR has some good history on this company:  https://w1ujr.com/written-word/gross-radio-company-circa-1931/  This device seem to be intended to hold in place a raw piece of quartz!  Cool. 

-- To the right of the books there is a serious-looking VFO.  One dollar!  Deal!  It is a CB VFO, but the markings say it puts out 5.44 to 5.99 MHz.  So it should be useful.  The dual speed dial is very nice.  

-- Above the VFO is a nice step attenuator from the "Arrow Antenna" company of Loveland Colorado. 

-- Further to the right are some Electric Radio and Antique Wireless Association magazines that Armand WA1UQO gave me.  Really nice.  The AWA mags have a very thoughtful piece (warts and all) on Jean Shepherd.  And the ER pile has an article by Scott WA9WFA that mentions my work on the Mate for the Mighty Midget receiver.  Thanks again Armand! 

-- I also got some ADE6+ surface mount mixers.  The price was right! 

Thanks to VWS for putting on this great hamfest! 

Wednesday, January 3, 2024

Mostly DIY RF's Kit of Pete N6QW's P3ST

 
There it is.  Truly a thing of beauty. Order yours today!  


Saturday, May 27, 2023

Hans Summers G0UPL and his new QMX: The Bob Crane W8SX FDIM Interviews Part 1 (audio)

http://qrp-labs.com/qmx.html

We are very pleased and grateful to present this year's series of Four Days in May interviews by our FDIM correspondent Bob Crane W8SX.   Once again Bob did an outstanding job interviewing the FDIM participants. 

In this interview, the amazing Hans Summers talks about his latest QRP Labs kit, the QMX.  It is a combination of the QCX Mini and the QDX.  

Hans explains the M:  QMX. The M is for Marriage. Magnificent. Merger. Marvelous, many things like that. It’s what you get when you marry the mechanical and conceptual design of QCX-mini, with the SDR, multi-band digital implementation of QDX. Simply: QDX + QCX-mini = QMX. 

It has a very clever switching power supply that automatically adjust to prevent spurs and harmonics from the power supply from appearing in the band of interest. 

I was especially interested in his plans to implement an SSB option in future software updates.  Hans will use the same very complicated SSB generation scheme used in the trueSDX rig, but hopes to achieve higher performance and  improved signal quality due to the much more robust hardware of the QMX. 

Here is the interview: 

http://soldersmoke.com/G0UPL23.mp3

Here is the QRP Labs site about the QMX:  http://qrp-labs.com/qmx.html

Here is the QRP Labs web site: http://qrp-labs.com/

And here is a really wonderful and very current article by Hans on the evolution of QRP Labs and its rigs from 2010 right on up through 2023 and the QMX.  It is really interesting: 

http://qrp-labs.com/images/qmx/docs/fdim2023.pdf

Thanks to Bob Crane W8SX, Hans Summers G0UPL, and all of the FDIM organizers. 

Hans G0UPL-- Homebrew Hero

Thursday, May 25, 2023

PSSST! MostlyDIYRF Will Sell a Kit of Pete's Rig!


From the wizard of Newbury Park!

The Pssst Transceiver Kit

Sometimes you just want to put something together and have it work, you know? No futzing with isolation pads, superglue, and blank copper-clad, no dead-bug make-shifts, no ugly, ugly, ugly component acrobatics. Sometimes, a nice and orderly printed-circuit board that's just like uptown, along with sorted and clearly-labeled components and step-by-step instructions, can provide respite from the terrors and risks of scratch-built homebrewing. Just once in a while, mind you.

Here's a dandy kit that can get you on 15, 17, or 20 meters pretty quickly, is fairly simple to put together (only eight transistors), and is small enough to take on a trip. At the same time, its modular architecture makes it also an experimenter's platform. It's not a single PCB and a mess of components. Each circuit block is its-own module which you can swap out for a different one you scratch build later on.
Why would you want to do that? Suppose, for instance, you want a narrower passband for the SSB filter (maybe even narrow enough for CW use). Likewise, you might want a wider or narrower front-end bandpass filter, or a different frequency response for the mic amp. Or, how about an active or triple-balanced diode-ring mixer for the product detector, or maybe higher gain in the RF amplifier on receive? Because the circuit modules in the Pssst just plug into a motherboard, you can unplug one and put another one in.

Of course, you can do this to change bands as well. All you need to do is to swap out the front-end band-pass filter and you can put the rig on 15 or 17 or 20 meters (along with changing a jumper on the digital VFO/BFO board).

The Pssst was designed and originally built by Pete Juliano, N6QW (Pete's Simple Single-Sideband Transceiver). Rather than use bidirectional circuits for many of the blocks, he relies on inexpensive relays to "steer" the modules from receive to transmit modes. Each active module uses a single transistor for gain (except for the final amp which uses three), and in that way the Pssst is a minimal design that, because of its modular architecture, can be made as complex and as elaborate as the experimenter wishes.

The Pssst is designed for a nominal output of 5 Watts on 20M when fed with 12VDC. By feeding the final amp with a higher voltage and providing some active cooling (from a three-dollar "pancake" fan), output can be increased to beyond 15 Watts.

In addition to complete and detailed kit instructions, the Pssst design has an existing Groups.io "reflector" forum for the exchange of ideas and questions. The kit will be available in two basic versions: with or without enclosure panels and hardware.

Available on the 150th birthday of Lee DeForest, the inventor of the Triode (August 26th)


This was in the latest newsletter from MostlyDIYRF.  
Thanks to Pete Eaton for alerting us. 
FB Todd!  

Monday, June 27, 2022

Thoughts on Homebrew, Makers, DIY, and Hams -- from Lex PH2LB

Sometimes we get a comment that is so good that we elevate it to the main blog page.  That was the case with Lex PH2LB's comment on the blog post of Owen Duffy (yesterday). 

----------------------

When I started the hobby, it arose out of technological curiosity, the interest in understanding things and the will to make things myself (designing myself was not my main goal). It doesn't matter to me whether it is 100% DIY or a kit (such as Heathkit, Elecraft, QRP-Labs etc) which is modified or not after construction. Just having fun with the hobby and pushing boundaries. And yes I also have some off-the-shelf transceivers (I'm super happy with my FT817ND) and my QO-100 uplink is also a kit (which is then already soldered a little more than average). As far as new tools are concerned: here at home are 2 types of 3D printers, various tools for SMT assembly, and I have a nice workshop equipped with tools and equipment for metal / plastic / wood processing. And every day I try to learn something new, because I stand by the IBEW moto : If you know stuff, you can do stuff.

Am I a maker then? I wouldn't call myself that. Just like I don't call myself a hacker because I'm quite handy with computers, technology and have certain skills. I'm just a hobbyist who wants to do and make things after work.
---------------------
Lex is a true member of the International Brotherhood.  He is the one who took our beloved stickers onto the European continent and into a Netherlands pub.  He is the one who -- unforgettably -- saw the parallels between ham shacks and the "pleasure room" of "50 Shades of Gray" (See below -- apropos of his current message, we labeled his meme "50 Shades of Homebrew") For more on Lex see: https://soldersmoke.blogspot.com/search?q=PH2LB

Lex's web site (Shack on the Internet):  https://www.ph2lb.nl/blog/index.php?page=hamradio

 Thanks Lex! 


Monday, June 6, 2022

SolderSmoke FDIM Interviews: Hans Summers G0UPL Talks about the QDX and His New Balloon Tracker


Thanks to Bob Crane W8SX for getting us this wonderful interview with Hans G0UPL.  Its really amazing to hear Hans talk about how many QDX rigs and Baloon Trackers have been sold by QRP Labs, and how quickly they sell.  Really great.  Hans's comments on the realities of the parts shortage was also very interesting. 

Listen here (about 7 minutes):  http://soldersmoke.com/2022 G0UPL.mp3

U4B Balloon Tracker 

Saturday, May 21, 2022

Repairing the Sony ICF SW1 Receiver -- Used for Numbers Station Reception? Why no replacement for C-625?


Ten years ago, my friend John gave me this tiny Sony receiver.  It wasn't working.   I tried to fix it but quickly discovered that the tiny size of the device made repair difficult.  All you needed to do was to swap out some leaking electrolytics, but they are surface mount electrolytics -- replacing them is not for the faint of heart.  Kits are available, but again, this is not easy. 

In 2020 I got one of the kits, but didn't try to use it until yesterday.   It only supplied six of the electrolytics.  In the video above, they discuss replacing seven electrolytics, including the one that seems to be placed in the round black holder. C-625.  Why didn't my kit include a replacement for that one?  Could it be that this capacitor was not one of the leaky SMD caps?  

Replacing these caps really wasn't easy. At one point I inadvertently removed not just the bad cap, but also a nearby surface mount resistor.  Luckily the schematic showed it to be 0 ohms.  That was easily replaced.  I lifted one of the pads on one of the other caps -- I just slid it back into place and hoped for the best. 

BTW, I just today discovered that this little receiver may have been used late in the Cold War by those who needed to receive messages from the infamous Numbers Stations: 

 https://www.cryptomuseum.com/spy/sony/icfsw1/index.htm

Monday, May 16, 2022

Some Links for the Michigan Mighty Mite and the Color Burst Liberation Army from Dave K8WPE

Dave K8WPE has been one of the podcast's best friends and one of its most loyal listeners.  Dave was recently going through some back issues of SolderSmoke.  This sparked a renewed interest in the Michigan Mighty Mite and the Color Burst Liberation Army.   Dave sent us some useful links on this subject.  (I had forgotten about the .io CBLA mailing list!)   Thanks for this Dave, and for all your support and friendship over the years.  

--------------------------------------------------------

Guys and Gals

Please listen to some of these podcasts as they are very encouraging to any ham young or old that might want to build something, even as simple as a Michigan Mighty Mite transmitter. Here are references to the Michigan Mighty Mite.  The podcasts are listed below.


Check out podcasts # 166, 167, 168 in the Soldersmoke series for an in-depth discussion on this simple transmitter:


There are many YouTube videos also regarding this neat little transmitter and even companion receivers.


Another option is to build the Cricket (a full transceiver kit) from Four State QRP Club that is available for 20, 30 and 40 meters $34.70 shipped:   


Or the 80 enter one available from the designer (when the 4SQRP Club retires a kit the designer is free to continue to sell them himself) NM0S on eBay for $26.25 shipped:


If you build one of these kits John at 3rd Planet Solar in Gaylord has bags of crystals and a four position crystal switch kit for the Cricket and Pixie. Check him out at 


Please pass this on to your friends. Have fun. Build something.  Enjoy!  One person built the kit and framed it to put on the wall of his shack to PROVE that he could actually build an electronic gadget.  

Also there are many who use easily available color burst crystals from old TV sets and joined the Color Burst Liberation Army (CBLA). Check out 


Dave K8WPE since 1960

Wednesday, May 11, 2022

Electronics Manufacturing in New York City -- Limor Fried and Adafruit (video) -- "TRUST YOUR TECHNOLUST"


The Radio Gods seem to be directing my attention to my hometown: New York City.

I was recently in the city, observing the placement of various IBEW - WYKSYKDS stickers.  And as I work on my old Hammarlund HQ-100 I note that both the HQ-100 and I may have been produced on Manhattan island at about the same time (me definitely, but the HQ-100 may have been built in Mars Hill NC). 

This morning Jim W4JED reminded me that Limor Fried, MIT Engineer and founder of Adafruit,  is producing a lot of amazing electronics items right in NYC, on Manhattan Island, down in Chelsea.  Thanks Jim.  FB Limor!  

Watch the above video.  I really liked the sign Limor has above her workbench: 

"TRUST YOUR  TECHNOLUST."  

 Indeed.  Back to the HQ-100. This IS a case of technolust.  I'm not quite satisfied with the alignment.  And it bugs me.  I technolust for perfect alignment.    (Steve Silverman -- I think we should add technolust to the SS lexicon.) 

Tuesday, January 12, 2021

Pete N6QW and Steve G0FUW Talk to RSGB About Homebrew (Video)


Wow, what an unexpected treat!  Here we can watch Pete N6QW and Steve G0FUW talk to the Radio Society of Great Britain about homebrew radio.  Steve talks about kits and scratch-built rigs.  I really liked seeing his early rigs and his description of how building these rigs helped him become a more advanced homebrewer.  I also liked his mention of George Dobbs as a guiding light in the QRP and homebrew world. 

Pete focuses on SDR and provides a really great description of this approach to homebrew.  I was struck with how great it is that, after a lifetime of HDR building, Pete is willing to embrace this new technology. He talks about it as part of "a learning journey."  As always, he sets the example for us all.   

Thanks to Pete, Steve, and RSGB. 

Tuesday, July 14, 2020

ON6UU's DB4020 EA3GCY Rig


Hi,

Recently I got the EA3GCY newsletter,  it announced a new kit DB4020,  a 2 band transceiver kit covering 40 and 20 mtrs.  I know Javier EA3GCY’s kit are good so I ordered one.  A week later it arrived in a brown enveloppe in which I found all components and printboard wrapped in bubblewrap,  it was all well packed and after checking all components all was accounted for,  all components were indeed there.

8 toroids have to be wound,  following the instructions it was piece of cake,  no problem,  

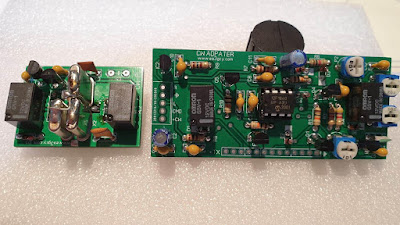
After several hours of work - relax max style - I got everything in place to test,  hurray,  no smoke !!!!  So now the SSB part was ready,  I have 7W on 40 and 3.5W on 20mtr.  Good power for qrp sota,  wff or just garden activity.  A fortnight later I got notice that the CW part of the kit was ready and another week later it arrived here,  I soldered the 2 boards as soon as possible to get a multimode 2 band transceiver.   The 2 boards are the CW interface which also holds the KB-2 keyer,  the second board is the 500-600HZ CW filter.   The KB-2 give the user 4 memories,  beacon function and some more functions.  Good thinking to include the keyer,  it makes life easy when you’re on an activation. ðŸ˜Š   I opted to make the filter switchable,  I like to be able to listen broadband too,  very simple,  cut one leg of the 13 pin connector on the bottom of the CW interface and put a switch on both ends.


After some figgling around I also got the box ready,  a military grade plastic box with wall thickness of 5 mm,  this box should be able to withstand a lot of shocks and a drop to the ground.  I also made a docking station for a laptop battery which holds some 5Ah and which should be able to give me a lot of hours of listening and some 2 to 3 hours of operation.  I had an old laptop which the screen was broken and had some other malfunctions,  I have taken the battery connector out of it,  luckily I still have another laptop which still works and this is the charging station for the batteries …. ..  ðŸ˜Š   The docking is only to test,  I will box it up in maybe a some box where I can then maybe also fit a end fed solution or tuner for coax fed antennas.


A new radio also needs a new CW key so I made one out of an old relay,  painted the base green to fit somewhat the box et voila,  here is the result of the complete portable station.


The key can be fitted to the box by means of a bolt and a wingnut.  A short cable goes to the CW connector of the transceiver.

I had a lot of fun constructing this kit,  the box,  the docking and the key.   For 180€ you get a arduino nano controlled CW/SSB transceiver with 2 bands on which most of the activity is and you also get a keyer with memories.   Good deal I think.   More info is available on EA3GCY’s website.  Javier is also very quick in responding to questions,  he ask for opinions and offers almost an Elecraft style of service.

I made some video’s which are on youtube :

The kitters website :

Best 73
Frank
ON6UU


Friday, April 17, 2020

Walter's VFO

Main VFO board under plastic -- buffer board off to the right
There is a lot of tribal knowledge in this short article by Walter KA4KXX.  (The most recent issue of SPRAT has a picture of a SPRAT cover from more than 30 years ago, announcing an article by Walter.  OM has been at this for quite a while.)  Walter's advice is similar to that of Doug DeMaw, especially on the air-core coil.   FB Walter,  thanks for sharing.  

Regarding the last line in Walter's article, please direct any complaints about drifting analog VFOs to Peter Juliano.  He will be delighted to receive these complaints, and will promptly provide all correspondents with very succinct advice on how to overcome the instability.  

My Way to a Low-Drift Analog VFO, by Walter KA4KXX

I recently built a digital VFO (from a QRP Labs Kit) to see what everybody is talking about, and it has been quite handy for my first two-band homebrew transceiver, but by the time one adds the low pass filter, a low-level RF amplifier to boost the weak output, a 5 VDC regulator, and a hefty +12VDC power line filter to the beast to keep the digital noise out of the rest of the radio, for a single band project I still prefer a low-drift analog VFO.  

My approach to minimizing drift is very simple and works well for a VFO range of 3 – 7.3 MHz, which is all that is needed for the 20 to 80 Meter bands, either direct conversion (adding a doubler for 20M) or single conversion with approximately a 10 MHz IF.  

First, see my schematic (adapted from Small Wonder Labs 40+ transceiver, original BITX40 Analog VFO, and other sources) and wind an air core inductor with stout magnet wire such as 24 or 22 AWG.  Use a thick, rigid plastic form of a diameter so that you need about 12 turns, and single coat with water-based sanding sealer, Q-dope, or similar.  Use hot glue to mount the coil firmly to the single-sided circuit board, and build a cover of some type, especially if the radio is to ever be used outdoors.
   
Second, all the VFO capacitors (except power supply bypass) should initially be the modern C0G type, which can be obtained from Mouser (such as TDK FG28C0G1H681JNT06 or the like), which I trust more than those labeled NP0.

Then, power up the VFO and tweak the coil, tuning arrangement, and range capacitor to get the frequency range you desire.

Next, monitor the drift from a cold start to see how fast it is moving as it warms up, and whether it stabilizes nicely (my goal for SSB Phone use is less than 20 Hz drift during any 10 minute period) after 10 – 15 minutes maximum.  If it does not stabilize to your satisfaction, then start substituting polystyrene caps for the C0G units one at a time until you are happy with the performance.

[Also remember that a stable BFO is important as well, and if you use the BITX 40 crystal oscillator design, I recommend installing a dedicated 78L09 power line regulator.]

If you build this VFO at the higher (7 MHz) frequency end, just change the inductor value to about 0.5 uH, with everything else about the same, but expect to do more tweaking to get stability, and the warm-up time may be closer to 15 minutes.  After years of experimenting, this is what has worked for me.  If it works for you, please send me an email (see my QRZ page) of thanks.  If not, file a complaint with Soldersmoke. 


Wednesday, February 19, 2020

Hi-Per-Mite Active Audio CW Filter Installed in uBITX (video)


Coming home from the Dominican Republic, this was a major item on my list of desired mods for the uBITX: a narrower passband for CW.  Using the 2.3 kHz SSB passband, you could have many CW QSOs audible in your headphones.  Narrow that passband to 200-300 Hz and life gets a lot easier. 

Farhan had discussed adding a 12 Mhz IF filter of suitable CW bandwidth, but this seemed difficult to me. Besides, I have long wanted to use an active audio filter for this purpose. 

The Hi-Per-Mite filter from 4 State QRP Group is just what I needed. I built the kit without problems in about an hour, then I put it in the uBITX box, with  switch on the front panel that lets me put it in the circuit or take it out -- this is very satisfying and a lot of fun.  

The Hi-Per-Mite just goes between the uBITX audio out and the speaker/headphone connection. I built mine for "no gain" -- the uBITX provides plenty of audio. 

The selectivity with the Hi-Per-Mite compares favorably to that of my Drake 2-B with the 500 Hz LC filter.  You can get an idea of the performance in the video. 

Three cheers for the 4 State QRP Group and their Hi-Per-Mite!  Here is the page with all the info: 

http://www.4sqrp.com/hipermite.php


Saturday, January 18, 2020

The End Fed Half Wave Antenna and EFHW Tuners


In the SPRAT 179 (Summer 2019) article describing their Peregrino (Pilgrim) transceiver,  Joan EA3FXF and Eduardo EA3GHS recommend the use of an End Fed Half Wave (EFHW) antenna. Their circuit incorporates an EFHW tuner and an SWR indicator.  As I planned my trip to the Dominican Republic with a uBITX, I had this antenna system idea in mind.  I was attracted by the possibility of avoiding having to carry coax with me.  And it seemed that an EFHW antenna would be easier to get up in the air than a coax-fed dipole. 

When searching for schematics for EFHW tuners I came across the QRPguys tuner kits.   

https://qrpguys.com/end-fed-half-wave-sota-antenna-tuner

This looked like just what I needed, so I ordered one.  But I placed my order kind of late, and I started to worry that I might not get the tuner kit in time.  So I decided to homebrew my own (just in case!) 


As it turned out, QRPguys got the kit to me in plenty of time. It went together very quickly and is a really useful piece of gear.  My homebrew version works fine, but I prefer the QRPguys device. 

You can check out the manual here: 

https://qrpguys.com/wp-content/uploads/2019/09/efhw_40m_tuner_assy_090119.pdf

The circuits are interesting.  The EFHW antennas present an impedance not of 50-70 ohms, but of 3000-5000 ohms.   The Peregrino and the the QRPguys circuits use a matching transformer to change the high impedance to 50 ohms.  In both circuits polivaricon capacitors are used to tune for resonance. The QRPguys circuit uses an N7VE LED absorption bridge -- I found it very satisfying to put the circuit into "tune" mode and then just adjust the capacitor until the LED went out.  That means the antenna system is presenting 50 ohms to the transmitter. 

SOTA beams has a good explanation of the EFHW antenna here: http://sotabeams.co.uk/efhw/
I did use a counterpoise. 


Saturday, August 18, 2018

QSX! Hans Summer's New SSB Rig Revealed in South Africa


I liked this video.   I liked Hans' description of his mechanical skills, and the way he has at times become a "human CNC machine."  

This seems like a much more sophisticated rig than the QCX.  I may be wrong, but  QCX seemed to be essentially an analog phasing rig with a narrow CW audio filter.  I kind of expected the SSB version to be a QCX with broader filter, but QSX is a different,  more sophisticated, SDR rig. 

Once again, three cheers for Hans Summers.  We should all pay him to go to those summer conventions -- every time he does, something new and important for ham radio comes out of the trip.  


Wednesday, May 30, 2018

Hans Summers and his QCX -- G0UPL Cracks the Code on Si5351A Quadrature


Pete,  Brad WA8WDQ and I were recently e-mailing about our admiration for what Hans G0UPL has achieved with his QCX rig.   I cc'd Hans -- we got this nice and very informative e-mail.  Be sure to click on the link provided by Hans, and from there go to the link to his FDIM proceedings article.  I think that article is a real masterpiece -- there is a lot of very valuable information in there.  For a long time, getting quadrature output from the Si5351 seemed like an impossible dream.  But Hans has obviously figured out how to do this, opening the door to much better and simpler single-signal phasing receivers.   Thanks Hans!  


Hi all

Thanks for the nice feedback on the QCX and the FDIM conference proceedings a article, which I have published on QRP Labs web page along with other Dayton trip miscellany. See


My seminar presentation audio was recorded by Ham Radio Workbench podcast and they will be publishing it on 5th June.

The QCX kit has indeed been unbelievably popular, almost 5,000 kits have been sold since the launch on 21st August. It seems to have itched an itch that needed itching, in the QRP world. Sales continue to be strong and I'm currently preparing another batch of 1000 more. 

I'm very proud of my 90-degree quadrature Si5351A and it helped me towards my low cost, high performance target for QCX. Abandoning the 74AC74 saves a part, reduces cost, reduces complexity, reduces board area (and hence more cost) and even seems to provide better performance (higher unwanted sideband rejection when using the Si5351A in quadrature mode). Getting the Si5351A to do this is one of those things which look easy afterwards. But at the time, and faced with SiLabs un-useful documentation, it took an awful lot of headscratching, trial and error!

I'm not sure of the answer to the question about noise figure. Certainly radios such as QCX and the NC2030 which use the QSD architecture seem to have very high sensitivity without an RF amplifier ahead of them. This must indicate a low noise figure. 


73 Hans G0UPL 

Sunday, May 13, 2018

A Construction Technique that REALLY "Nails it" -- But what do we call it?


Thanks to Rogier PA1ZZ (long in W6) for this.  I guess I have used a variation of this technique in some antenna tuner projects, and maybe in a crystal radio effort.   This also reminded both Pete and me of the electronic project kits that we were given as kids.  Those kits had little springs that were supposed to keep the components in contact.  They might have worked better with nails.  

This technique definitely provides an opportunity for an earnest young guy to make use of his soldering GUN.  I don't think a wimpy 35 watt iron would be up to the task.  


What should we call this technique?  We have "ugly" and "Manhattan" and
"Muppet Boards."   What do we call this? 


Tuesday, May 8, 2018

KE4MIQ's Repurposed Raduino Receiver


FB James -- Really glad you are listening,  and that you are having fun with a Direct Conversion receiver --- souped up with a Raduino! 


Bill, Pete

Just listened to #204. (New Listener)
You talked about using the Raduino with other radios.
I bought one of Mike Hagen's RaduinoXs to use with my Bitx40. So, I have repurposed my original Raduino as a VFO for my 4SQRP ZZRX-40 DC receiver. I used Allards's v1.26 with a few code changes to tune 7.000 to 7.300. It's currently al fresco on a piece of Hobby Lobby foam board. I may "cabinetize" at some future date.
Attached is a pic of the ZZRX-40, Raduino, and Goodwill Sony speaker with Jameco stereo amp, all running off of Harbor Freight 9v Nimh rechargables.

So far I have heard over 40 states and 20 countries with a 65ft piece of wire in the rafters.
73s
James
KE4MIQ

Monday, October 30, 2017

Modular BITX Boards

Saturday, October 7, 2017

IZ7VHF's Video on on Hans Summers' QCX Rig, and a Video from Hans


Thanks to W8SX for alerting me to this. 

There is a lot of good stuff on Roberto's site.  He obviously has THE KNACK. 

http://radio-signals.com/

Hans himself has a less detailed video on the rig:

Designer: Douglas Bowman | Dimodifikasi oleh Abdul Munir Original Posting Rounders 3 Column